Battery switch on travel trailer function is crucial for managing your RV’s power. Understanding how your battery switch works is key to preventing electrical problems and ensuring you have power when you need it, whether you’re boondocking or connected to shore power. This guide will walk you through different battery switch types, safe operation procedures, troubleshooting tips, and maintenance best practices.
We’ll also cover how your battery switch interacts with solar panels and inverters, and how it helps provide emergency power during outages.
From simple single-battery setups to more complex systems incorporating multiple batteries, solar, and inverters, we’ll break down the intricacies of your travel trailer’s electrical heart. Learn to confidently manage your power, maximize battery life, and avoid common pitfalls. This comprehensive guide will equip you with the knowledge to keep your lights on and your appliances running smoothly, no matter where your adventures take you.
Battery Switch Types in Travel Trailers

Choosing the right battery switch for your travel trailer is crucial for managing your power sources efficiently and safely. Different types of switches offer varying levels of control and complexity, each with its own set of advantages and disadvantages. Understanding these differences will help you select the best option for your needs.
Single Battery Switches
A single battery switch is the simplest type, typically found in smaller travel trailers with a single 12-volt battery. It’s a basic on/off switch that connects or disconnects the battery from the trailer’s electrical system. This provides a straightforward way to completely isolate the battery, preventing parasitic drain when the trailer is stored for extended periods. However, it lacks the flexibility to manage multiple batteries or different power sources.
Dual Battery Switches
Dual battery switches are designed for travel trailers equipped with two batteries, often a house battery and a starting battery for the tow vehicle. These switches allow you to isolate either battery independently, or to combine them for increased power capacity. Common examples include switches that offer three positions: “Both,” “House,” and “Start,” or “Off,” “Battery 1,” and “Battery 2.” This added control provides greater flexibility and prevents accidental draining of one battery while using the other.
The disadvantage is that they don’t offer the sophistication of multi-stage switches.
Multi-Stage Battery Switches
Multi-stage battery switches, sometimes referred to as selector switches, offer more advanced control over multiple batteries. These switches often have several positions, allowing you to select individual batteries, combine them, or completely isolate them. Some even include features like a “combination” setting to use both batteries simultaneously, an “off” setting for complete isolation, and individual settings for each battery.
This type of switch is ideal for larger trailers with multiple batteries or those needing precise control over power distribution. The increased complexity, however, often comes with a higher cost and slightly more intricate installation.
Comparison of Battery Switch Types
| Feature | Single Battery Switch | Dual Battery Switch | Multi-Stage Battery Switch |
|---|---|---|---|
| Number of Batteries Managed | One | Two | Two or More |
| Control Level | On/Off | Independent Isolation or Combination | Multiple Configurations, including Individual, Combined, and Off |
| Cost | Low | Medium | High |
| Maintenance | Low | Low | Low |
Battery Switch Operation and Procedures
Operating your travel trailer’s battery switch correctly is crucial for maintaining your power system and preventing damage. Understanding the process and safety precautions is essential for a safe and enjoyable camping experience. Improper handling can lead to electrical shocks, battery damage, or even fires.Proper operation involves a simple, yet critical, procedure. Always remember to prioritize safety.
Safe Battery Switch Operation
Before interacting with the battery switch, always ensure the main power breaker to your trailer is turned OFF. This disconnects the house batteries from all circuits and significantly reduces the risk of electric shock. Next, locate your battery switch; it’s usually found near the batteries themselves or in a convenient, easily accessible location within the trailer’s storage compartment. The switch itself will typically have three positions: “Off,” “Battery,” and “Battery & Shore.” To activate your house batteries, move the switch to the “Battery” position.
This connects the batteries to the trailer’s 12-volt system, powering lights, appliances, and other DC-powered devices. If you’re connected to shore power, switch to the “Battery & Shore” position to use both your batteries and the external power source. Remember to turn the switch to “Off” when you’re finished using your trailer to conserve battery power and prevent accidental discharges.
Safety Precautions When Working with Battery Switches and Wiring
Working with batteries and electrical systems always carries inherent risks. Always wear appropriate safety glasses to protect your eyes from potential sparks or acid splashes. Rubber gloves are highly recommended to prevent electrical shock and protect your hands from battery acid. Never touch bare wires or terminals while the system is energized. If you’re unsure about any aspect of the process, consult a qualified RV technician.
Acid from lead-acid batteries can cause serious burns and damage clothing. Clean any spills immediately with a baking soda and water solution, neutralizing the acid. Proper ventilation is also important when working near batteries to avoid inhaling potentially harmful fumes.
Troubleshooting Common Battery Switch Problems
Problems with your battery switch can range from a simple blown fuse to a more serious wiring issue. A systematic approach to troubleshooting can help you identify and resolve the problem quickly and efficiently.Before starting, always disconnect the power to the battery system at the main breaker.
So, you’re planning a trip? Awesome! Don’t forget travel insurance – it’s a lifesaver. Check out Aon travel insurance for comprehensive coverage. They’ve got options for everything from medical emergencies to lost luggage. Speaking of comprehensive, if you want to compare and contrast, another great resource to look at is Aon travel insurance – they often have different deals and packages.
Seriously, get insured before you go; you won’t regret it!
- No Power: First, check the battery switch itself to ensure it’s in the correct position (“Battery” or “Battery & Shore”). Next, verify that your batteries are adequately charged and have sufficient voltage. Use a multimeter to test the battery voltage. If the voltage is low, recharge the batteries. If the voltage is adequate, inspect the fuses both near the battery switch and within the trailer’s fuse panel.
Replace any blown fuses with fuses of the same amperage rating. If the problem persists, carefully examine the wiring connections for any loose or corroded terminals. Clean and tighten any loose connections.
- Blown Fuses: Blown fuses are often caused by a short circuit or an overload on the electrical system. Before replacing the fuse, identify the cause of the short circuit or overload. This might involve checking appliances or lights for faults. Using a fuse with a higher amperage rating is unsafe and could lead to a fire. Always replace blown fuses with fuses of the correct amperage rating.
So, you’re planning a trip? Awesome! Don’t forget travel insurance! Check out aon travel insurance for comprehensive coverage. They’ve got options for everything from lost luggage to medical emergencies. And if you want another opinion, comparing options is always a good idea, so also look at aon travel insurance on this other site – sometimes they have different deals.
Getting insured is just smart planning; peace of mind is priceless, right?
- Switch Malfunction: If the switch itself seems to be faulty (it doesn’t click into place or doesn’t seem to make a connection), it may need to be replaced. This is a job best left to a qualified RV technician unless you possess the necessary expertise and comfort level with electrical systems.
Battery Switch Wiring Diagrams and Schematics: Battery Switch On Travel Trailer Function
Understanding how a battery switch integrates into your travel trailer’s electrical system is crucial for safe and reliable operation. A clear wiring diagram simplifies troubleshooting and ensures correct installation. This section will illustrate a basic setup and discuss the importance of protective devices.
A typical wiring diagram shows the battery switch as the central point connecting the trailer’s battery to the various circuits. Power flows from the battery, through the switch, and then to the distribution panel or directly to individual appliances. This diagram simplifies a complex system, allowing for easier understanding and maintenance.
Simple Battery Switch Wiring Diagram
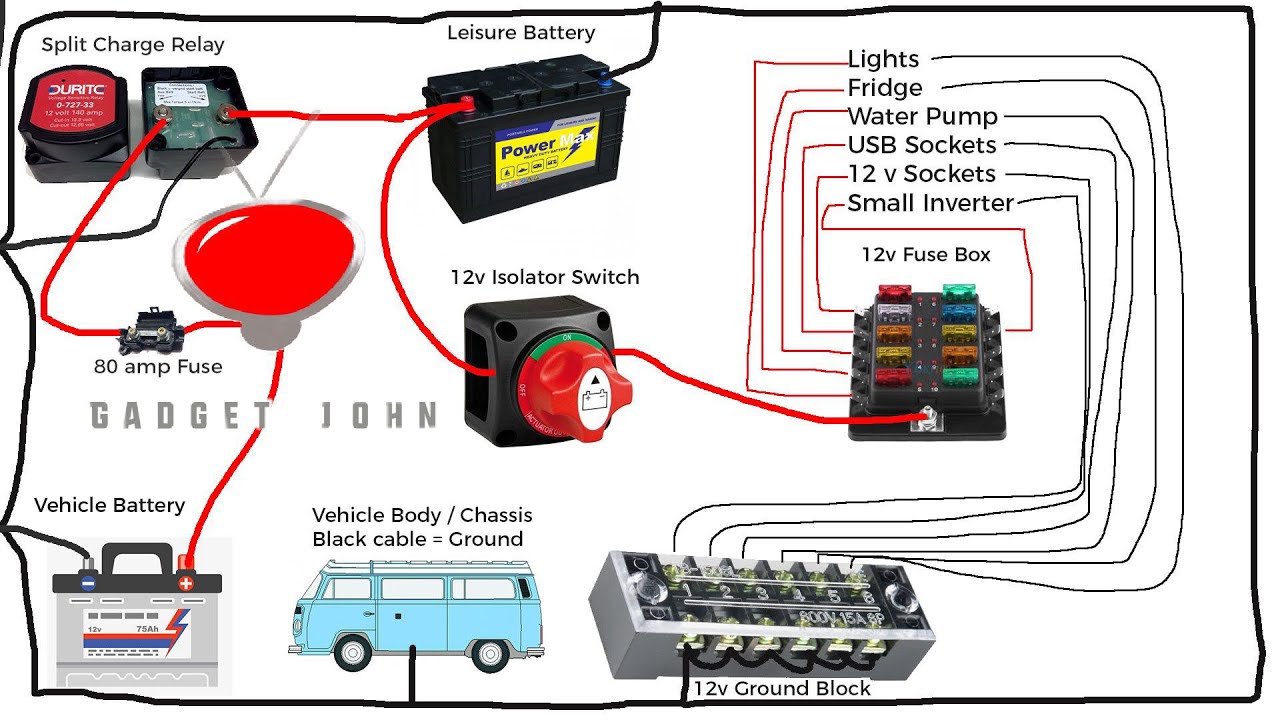
Imagine a simple diagram: Your deep-cycle battery is represented by a circle with a “+” and “-” terminal. A wire runs from the positive (+) terminal to the “IN” terminal of a battery switch. Another wire connects the “OUT” terminal of the switch to the positive bus bar of your trailer’s distribution panel. A separate wire runs from the negative (-) terminal of the battery directly to the negative bus bar of the distribution panel, bypassing the switch.
This is a common configuration for a battery disconnect switch. All other circuits branch off the distribution panel.
For added clarity, you could visualize a fuse or circuit breaker placed in the positive wire leading from the battery to the switch, providing overcurrent protection. Similarly, a fuse or circuit breaker might be incorporated in the line leading from the switch to the distribution panel. This protects both the battery and the wiring from potential overload.
The Role of Fuses and Circuit Breakers
Fuses and circuit breakers are essential safety components in any electrical system, and your battery switch setup is no exception. They prevent damage to wiring and appliances by interrupting the circuit when excessive current flows. A fuse is a one-time use device; once it blows, it needs replacing. A circuit breaker, on the other hand, can be reset after an overload.
In a typical setup, a fuse or circuit breaker might be placed in the positive wire leading from the battery to the switch, protecting the wire against short circuits and overloads. Another fuse or circuit breaker should be located between the switch and the distribution panel, protecting the circuits and appliances connected to the panel. The size of the fuse or circuit breaker should match the capacity of the wire and the load it is intended to protect.
Different Wiring Configurations and Their Implications
While the simple diagram provides a basic understanding, several variations exist. For instance, some systems might incorporate a second battery, requiring additional wiring and potentially a second switch or a dual-battery switch. The way these components are connected significantly impacts the system’s functionality and safety. A poorly designed configuration could lead to unintended power flows or even fire hazards.
Consider a setup with two batteries: one deep-cycle for house functions and one starting battery for the tow vehicle. A dual-battery switch allows for independent control of both batteries, enabling you to disconnect one while keeping the other active. The wiring would be more complex, involving multiple connections to both switches and both batteries, requiring careful attention to detail during installation and maintenance.
Improper wiring in a dual battery setup could lead to cross-charging issues or draining of the starting battery, leaving you stranded.
Maintaining the Battery Switch
Keeping your travel trailer’s battery switch in top condition is crucial for reliable power and preventing costly repairs down the road. Regular maintenance ensures your batteries stay charged, your appliances function correctly, and you avoid unexpected power outages while on the road. Neglecting maintenance can lead to corrosion, malfunction, and even fire hazards.Regular inspections and cleaning are key to a long-lasting battery switch.
A well-maintained switch will provide years of trouble-free service, making your camping trips more enjoyable.
Battery Switch Maintenance Schedule
A simple maintenance schedule will keep your battery switch functioning optimally. This schedule balances thoroughness with practicality, ensuring you don’t spend excessive time on maintenance.
- Monthly Inspection: Visually inspect the switch for any signs of corrosion, loose connections, or damage to the casing. Check for any unusual smells or noises emanating from the switch.
- Semi-Annual Cleaning: Use a wire brush or a dedicated battery terminal cleaner to remove any corrosion buildup on the switch terminals and connections. Apply a corrosion inhibitor to the cleaned terminals to prevent future corrosion.
- Annual Thorough Inspection: Perform a more detailed inspection, including checking the tightness of all connections and visually examining the wiring for any signs of wear or damage. If any issues are found, address them immediately.
Corrosion Prevention
Corrosion is the enemy of any electrical connection, and your battery switch is no exception. Corrosion can increase resistance, leading to poor connections and potentially overheating.To prevent corrosion, always keep the switch and its terminals clean and dry. Apply a dielectric grease or corrosion inhibitor to the terminals after cleaning. This creates a protective barrier that prevents moisture and other contaminants from reaching the metal surfaces.
Regularly inspect for any signs of corrosion – even a small amount can cause problems over time. A common example of corrosion is a white, powdery substance forming on the terminals.
Identifying a Failing Battery Switch
Several signs can indicate a failing battery switch. These signs range from subtle indications to more obvious problems that demand immediate attention.
- Intermittent Power: If your appliances are working sometimes and not others, even when the battery switch is in the “on” position, the switch itself may be faulty.
- Overheating: Excessive heat around the battery switch indicates high resistance, likely due to corrosion or a failing internal component.
- Visible Damage: Cracked casing, melted wiring, or loose terminals are clear signs of a problem requiring immediate attention. This could be a safety hazard.
- Dim Lights or Slow Starting: If your lights are dimmer than usual or your appliances are running sluggishly, a poor connection within the switch could be the culprit.
Repairing or Replacing a Battery Switch
If you identify a problem with your battery switch, repair or replacement might be necessary. Minor corrosion can be cleaned and treated, but more significant damage usually necessitates replacement.Repairing a battery switch often involves cleaning corroded terminals and tightening loose connections. If internal components are damaged, however, replacement is usually the best solution. When replacing the switch, ensure you choose a switch with the correct amperage rating for your battery system.
Improperly sized switches can lead to overheating and fire hazards. Always disconnect the battery before working on the switch to prevent electrical shock.
Battery Switch and Emergency Power
Your travel trailer’s battery switch is more than just a way to disconnect your batteries; it’s a crucial component for managing power and ensuring you have electricity when the grid goes down. Understanding its role in emergency power situations is vital for safe and comfortable camping.Proper use of your battery switch allows you to prioritize power to essential appliances during a power outage, extending the life of your batteries and ensuring you have access to critical functions.
This is especially important in situations where you might be reliant on your trailer’s power for lighting, refrigeration, or other necessities.
Prioritizing Power to Essential Appliances, Battery switch on travel trailer function
Using the battery switch to prioritize power involves understanding your trailer’s electrical system and the power demands of individual appliances. By strategically disconnecting non-essential circuits, you can conserve battery power and ensure that critical systems remain operational for a longer period. For instance, you might choose to power only your refrigerator and a few lights, while disconnecting the air conditioner and other high-draw appliances.
This requires careful planning and familiarity with your trailer’s wiring and the switch’s configuration.
Appliance Power Consumption and Battery Life Impact
The following table illustrates the approximate power consumption of various common travel trailer appliances. Remember that these are estimates and actual consumption can vary based on factors like appliance age and usage. This data can help you make informed decisions about which appliances to prioritize during an emergency power situation. Note that battery life will vary significantly depending on battery capacity (Ah) and the overall energy demand.
A larger battery bank will obviously last longer.
| Appliance | Approximate Power Consumption (Watts) | Approximate Runtime on a 100Ah Battery (hours)1 | Impact on Battery Life |
|---|---|---|---|
| Refrigerator (12V) | 50-100 | 10-20 | Moderate to High (depending on use) |
| LED Interior Lights | 5-10 per light | High (many hours per light) | Low |
| Air Conditioner (12V) | 150-300 | 3-6 | Very High |
| Water Pump (12V) | 10-20 | 50-100 | Low |
1These runtimes are estimations and assume a fully charged 100Ah battery with 50% depth of discharge. Actual runtimes may vary.
Mastering your travel trailer’s battery switch is a vital skill for any RV owner. By understanding the different types of switches, their operation, and maintenance needs, you can ensure reliable power for all your on-the-road adventures. Remember to prioritize safety when working with electrical systems, and don’t hesitate to consult a professional if you encounter any issues you can’t troubleshoot.
With proper knowledge and care, your battery switch will serve you well, providing years of reliable power for your travels.
Quick FAQs
What happens if my battery switch is left in the “off” position?
Leaving the switch off completely disconnects your house batteries from the trailer’s electrical system. This prevents battery drain but also means you’ll have no power to your appliances.
How often should I inspect my battery switch?
At least once a year, or more frequently if you notice any issues like corrosion or loose connections. Regular inspection is crucial for preventing problems.
Can I use a different type of battery with my existing battery switch?
It depends on the switch and battery type. Some switches are designed for specific battery chemistries (like lead-acid vs. lithium). Check your switch’s specifications and consult a professional if unsure.
My battery switch is sparking. What should I do?
This is a serious issue. Immediately disconnect the battery and consult a qualified RV technician. Sparking indicates a potential short circuit and fire hazard.
